


Learn how kinesiology tape can support scar and bruise recovery
Follow our step-by-step kinesiology taping guide to improve blood flow, reduce bruising, and support scar tissue mobility — at home.
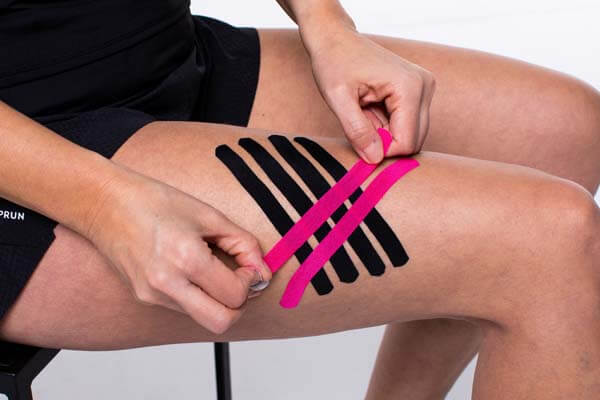
Do you have a bruise or scar that is limiting movement, causing discomfort, or recovering slowly?
Bruises develop when blood collects under the skin following an impact or injury. Kinesiology tape can be applied in a lymphatic grid pattern to stimulate circulation and help the body reabsorb the bruising more quickly. The tape creates a gentle lifting effect on the skin, which improves lymphatic drainage and can reduce swelling and discolouration.
For scars — whether from surgery, injury, or burns — kinesiology tape can be applied once the wound is fully closed and the skin is intact (usually after 6–8 weeks). The tape gently mobilises the scar tissue and surrounding fascia, which can improve flexibility, reduce tightness or pulling, and help desensitise the area. Always consult a therapist or GP before taping fresh or sensitive scars.
Jump to: Preparation · Measuring & cutting · Application
-

CureTape® Art
€10,95In stockSelect options This product has multiple variants. The options may be chosen on the product page

This taping method may help with:
Reduce bruising
Improve lymphatic drainage around the bruised area
Mobilise scar tissue
Improve flexibility and reduce tightness around scars
Improve circulation
Stimulate blood flow for faster tissue recovery
Desensitise the area
Reduce sensitivity and pulling sensation around scars
It can be applied for:
Bruises
Post-impact bruising from sports or daily injuries
Surgical scars
Scars from operations once fully healed (6–8 weeks)
Injury scars
Scars from cuts, burns or skin injuries
Scar tissue tightness
Restricted movement or pulling sensation around scar tissue
Self-taping for scars and bruises
Tips to ensure your taping treatment goes smoothly:
For scars: only tape once the wound is fully closed — typically after 6–8 weeks.
Always consult a therapist or GP before taping fresh or sensitive scars.
Read the instructions carefully before you start.
Apply tape without stretch — lymphatic and scar taping never uses tension.
Rub the tape gently after application to activate the adhesive.
On average, the tape will remain in place for 3 to 7 days.
Showering is possible while wearing the tape.
Removing the tape is easier with a little oil.
Preparation before taping scars or bruises
- Shape
- customised I-strip
- Number of strips
- depending on the size of the scar or bruise.
- Technique
- ligament technique (maximum stretch)
Measuring and cutting the tape
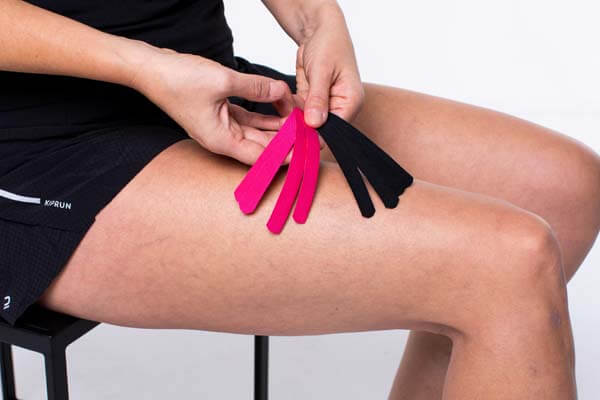
Measure & Cut
- Measure the tape according to the length of the scar or the size of the bruise.
- Cut the 5 cm wide tape three times lengthwise to create four equal, narrow strips.
Applying the tape for scars and bruises
All strips are applied without any stretch. The lifting effect of the tape is what creates the therapeutic benefit — not tension. For scars, never tape directly over an open wound.
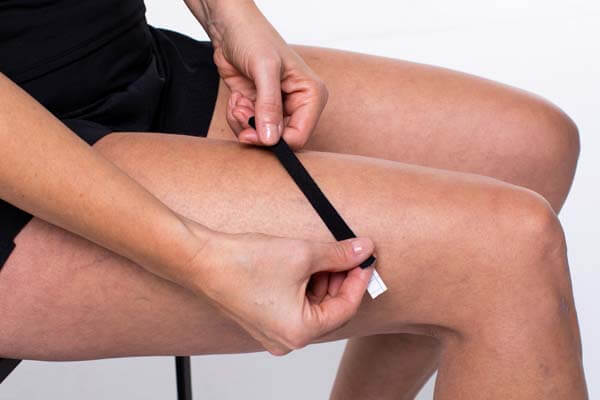
Step 2
- Tear the backing paper in the middle, fold it to the right and left, and stretch the centre part of the tape to its maximum.
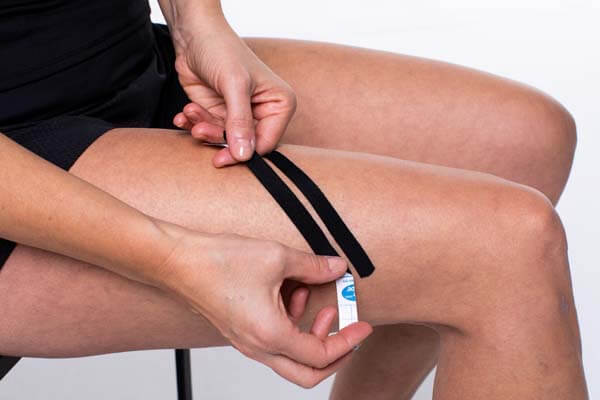
Step 3
- Place the tape at a 45-degree angle to the direction of the scar or the area being treated.
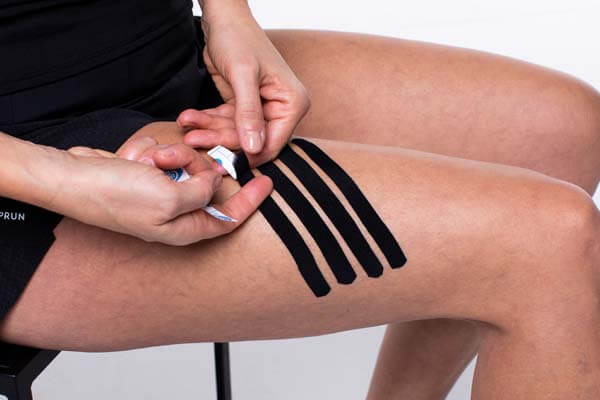
Step 4
- Carefully apply the two anchors without stretch and smooth the tape down. At intervals of about 1 cm, repeat the process with the other strips until the entire scar or bruise is covered.
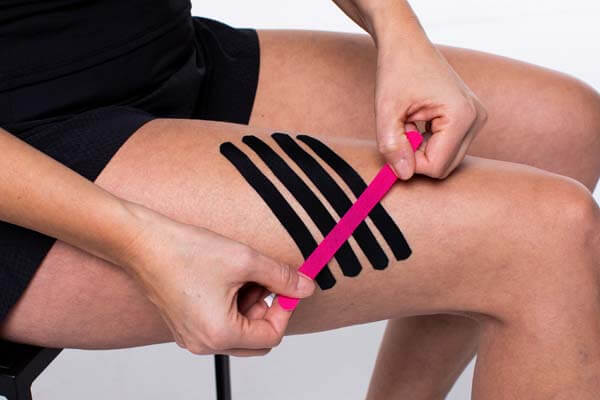
Step 5
- Add additional strips at a 45-degree angle in the opposite direction, so that they cross exactly in the middle of the scar or bruise.
Step 6
- Apply as many strips as needed until the whole area is covered.
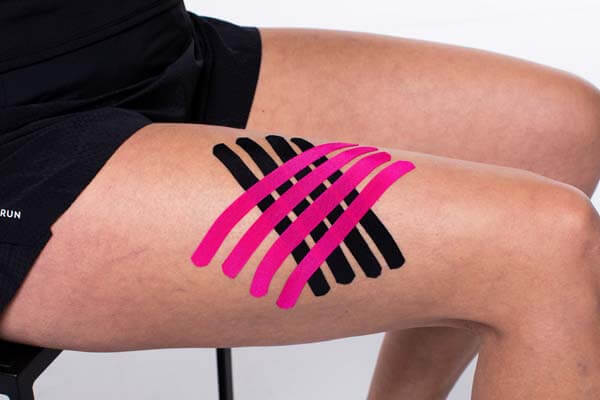
Finished
- Rub the tapes firmly to ensure good adhesion. Replace every 3–7 days. If irritation occurs, remove the tape immediately.
Popular products to tape your scar or bruise
-
CureTape® Classic
€9,95In stockSelect options This product has multiple variants. The options may be chosen on the product page -
CureTape® Art
€10,95In stockSelect options This product has multiple variants. The options may be chosen on the product page -
CureTape® Sports Extra Sticky
€10,95In stockSelect options This product has multiple variants. The options may be chosen on the product page -
CureTape® Soft Touch Scissor
€12,95In stockAdd to cart


 Trusted by professionals for 25+ years
 Europe-wide shipping
Free delivery from €100
Europe-wide shipping
Free delivery from €100 When taping your scar or bruise, it’s crucial to choose a tape that provides strong adhesion and support. That’s why I recommend CureTape kinesiology tape. For regular use, CureTape Classic or Art is ideal. However, if you’re engaging in extreme sports or swimming, opt for the extra sticky CureTape Sports variant! I have selected practical, easy-to-follow self-taping applications alongside a few valuable tips from clinical experience. For an optimal recovery, remember to combine this taping with specific gentle massage techniques, and always consult a physiotherapist or GP if your symptoms persist.

Disclaimer: Please note: the suggested tape applications and the information on our website regarding the possibilities of the Medical Taping Concept are not yet scientifically proven. The stated claims are based primarily on extensive experience from therapists and users of CureTape® products. No rights can be derived from the content on this website.
Contraindications for not using tape: pregnancy, open wounds, bone fractures, unexplained complaints, allergies and skin conditions, medication use such as blood thinners, thrombosis, and fever. Always consult a medical professional if in doubt.