


Learn how to relieve jaw joint pain with kinesiology tape
Follow our step-by-step kinesiology taping guide to relieve pain and tension in the jaw joint (TMJ) — at home.

Would you like to know how to tape a painful jaw joint yourself in an easy way? In this article, we’ll take you step by step through the process.
Facial pain can have many different causes. If it occurs while moving the jaw joint, for instance when chewing, it may indicate a problem with the temporomandibular joint. Sometimes the jaw does not open fully and may crack or grind when the mouth is opened. Other issues can also appear, such as toothache, earache, headaches, neck pain or sensitivity around the jaw joint. If you experience these symptoms for a longer period, it is advisable to seek help from a professional or doctor.
Taping can provide significant relief for the jaw joint. Often, people notice that after applying the tape, the jaw can open more freely and the discomfort lessens.
Jump to: Preparation · Measuring & cutting · Application

This taping method may help with:
Relieve jaw pain
Reduce tension and discomfort in the TMJ area
Improve mobility
More comfortable mouth opening and chewing
Relax the jaw muscles
Ease overloaded masseter and pterygoid muscles
Reduce clicking
Less joint noise through improved muscle balance
It can be applied for:
TMJ dysfunction
Pain or clicking in the temporomandibular joint
Bruxism-related tension
Jaw muscle fatigue from teeth grinding or clenching
Chewing pain
Discomfort when biting or chewing
Limited mouth opening
Restricted jaw opening caused by muscle tension
Tips to ensure your jaw joint taping treatment goes smoothly:
If you are unsure about the cause of your jaw pain, consult a professional first.
Perform a skin patch test before applying tape to the face.
Use CureTape Beauty — a thin, skin-toned tape designed for the face.
Do not apply stretch at the beginning and end of the tape.
Apply gently — do not pull or stretch the facial skin.
On average, face tape stays in place for 3 to 7 days.
Remove carefully using a little oil to avoid skin irritation.
If irritation occurs, remove the tape immediately.
Preparation before taping for jaw joint pain
- Shape
- Two short I-strips of approximately 8–12 cm, applied along the masseter (jaw muscle) on each side. Round all ends. CureTape Beauty recommended.
- Number of strips
- 2 (one per side)
- Technique
- Muscle technique — light tension along the masseter muscle from cheekbone toward jawline. Anchors without stretch. Applied with mouth slightly open.
Measuring and cutting the tape
Take a piece of tape 5 cm wide and cut it lengthwise in half.
Applying the tape to your jaw joint
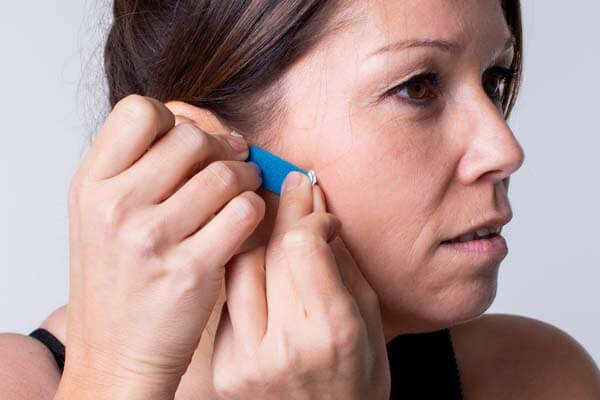
Step 1
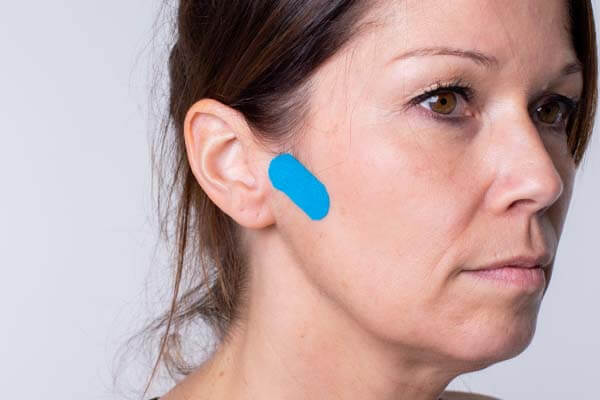
Step 2
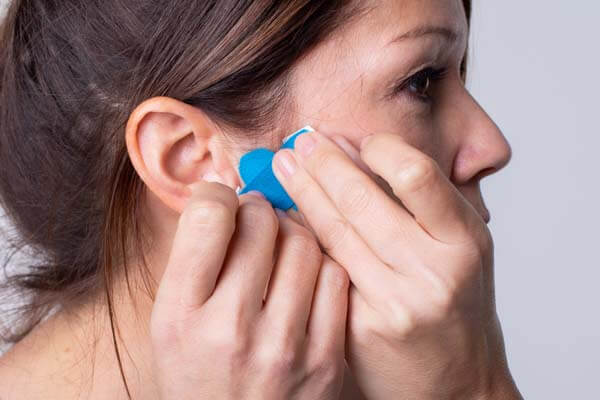
Step 3
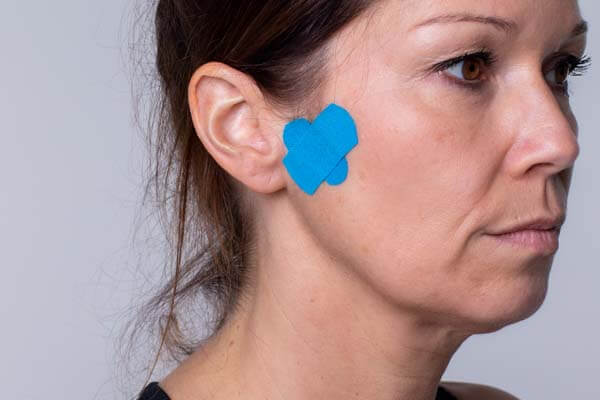
Step 4
Popular products to tape your face

 Trusted by professionals for 25+ years
 Europe-wide shipping
Free delivery from €100
Europe-wide shipping
Free delivery from €100 When taping your face, it’s crucial to choose a tape that provides strong adhesion and support. That’s why I recommend CureTape kinesiology tape. For regular use, CureTape Classic or Beauty or Art is ideal. I have selected practical, easy-to-follow self-taping applications alongside a few valuable tips from clinical experience. For an optimal recovery, remember to combine this taping with specific facial exercises or relaxation techniques, and always consult a physiotherapist or GP if your symptoms persist.
For the self-taping instructions, I have chosen applications that are simple to apply on your own. To ensure the treatment is carried out safely, I provide practical guidance to keep in mind before, during and after taping. These recommendations are based on my many years of professional experience. If the complaints persist, always consult a physiotherapist or your GP.

Disclaimer: Please note: the suggested tape applications and the information on our website regarding the possibilities of the Medical Taping Concept are not yet scientifically proven. The stated claims are based primarily on extensive experience from therapists and users of CureTape® products. No rights can be derived from the content on this website.
Contraindications for not using tape: pregnancy, open wounds, bone fractures, unexplained complaints, allergies and skin conditions, medication use such as blood thinners, thrombosis, and fever. Always consult a medical professional if in doubt.