


Learn how to reduce lower leg and ankle swelling with kinesiology tape
Follow our step-by-step kinesiology taping guide — at home.

Would you like to learn how to tape your lower leg and ankle using lymphatic tape? In this guide, we’ll take you through the process step by step.
In this drainage method, modified I-strips are applied differently from standard lymphatic taping techniques. They are placed in opposite directions in a spiral pattern, which enhances the effect on the lymphatic system and helps reduce swelling. At the same time, the tissue is gently mobilised.
This approach is especially useful in cases such as a calf strain, where a small muscle tear leads to swelling. If you suspect a muscle tear, it is recommended to first consult a professional, such as a physiotherapist or GP, for proper treatment. By applying this taping technique, you can support recovery: the muscle is gently mobilised, blood circulation is improved, and pain is reduced. Try to load the muscle only lightly and within the pain-free range. The tape is also very effective at preventing hardening of the calf muscles and reducing calf cramps.
Jump to: Preparation · Measuring & cutting · Application
-

MyCureTape® Sports 3-Roll Combi Pack
€17,95In stockSelect options This product has multiple variants. The options may be chosen on the product page
This taping method may help with:
Reduce swelling
Stimulate lymphatic flow to drain excess fluid from the lower leg and ankle
Improve circulation
Enhance blood and lymph flow to support tissue recovery
Mobilise tissue
Gently mobilise the calf and ankle tissue during movement
Support recovery
Reduce pain and help prevent hardening of the calf muscles
It can be applied for:
Oedema & fluid retention
Swelling of the lower leg or ankle due to poor lymphatic drainage
Calf strain
Small muscle tear leading to local swelling and restricted movement
Calf cramps
Reduce frequency and severity of calf cramps through improved circulation
Post-injury swelling
Swelling after an ankle sprain, bruise, or overuse injury
Self-taping the lower leg and calf
Tips to ensure the taping treatment goes smoothly:
Is the cause of the pain or complaint clear?
Read the instructions carefully before starting the taping process.
Choose the tape colour you prefer.
Do not apply stretch at the beginning or end of the tape.
Rub the tape well to ensure proper adhesion.
Check whether there are any reasons why taping should be avoided.
On average, the tape stays in place for 3–7 days.
It is fine to shower while wearing the tape.
Removing the tape is easier if you use a little oil.
Preparation before taping your lower leg and ankle
- Shape
- 3 customised I-strips, 2.5 cm wide
- Number of strips
- 3
- Technique
- Drainage technique (without stretch)
Measuring and cutting the tape

Measure & Cut
- Measure the length of the tape from just below the knee crease down to the foot, following a spiral around the lower leg.
- Cut the tape to the correct width (halve 5 cm to 2.5 cm).
Applying the tape to your lower leg and ankle
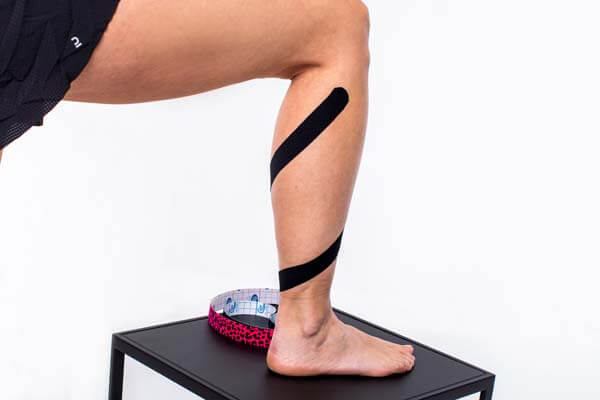
Step 2
- Place the base of the first strip on the outer side of the lower leg, applying it without stretch.
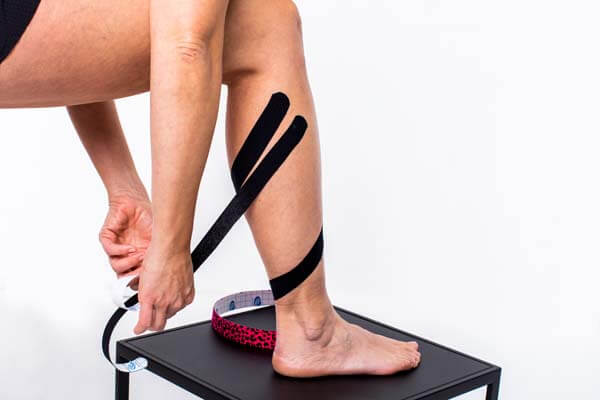
Step 3
- Lay the tape completely slack in a spiral pattern around the lower leg towards the ankle. Anchor it at the back of the foot.
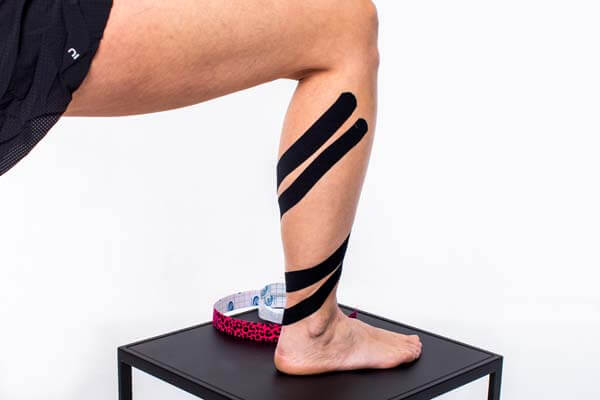
Step 4
- Apply the base of the second strip, again without tension. Start slightly offset below the first tape and guide it in a spiral towards the ankle, with the anchor also positioned at the back of the foot.
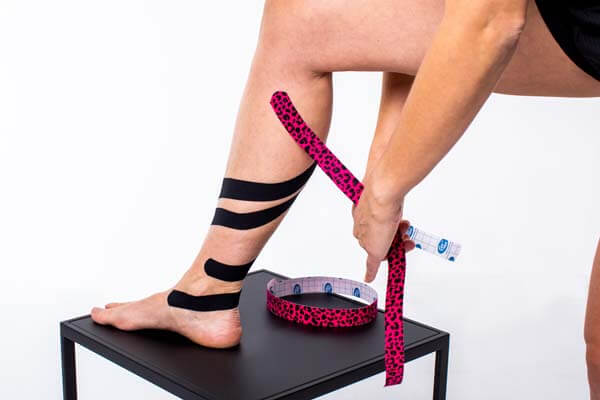
Step 5
- Place the base of the third strip without stretch on the inner side of the lower leg. Apply it in the opposite direction to the first two, spiralling down towards the ankle. The anchor should end at the back of the foot on the inner side.
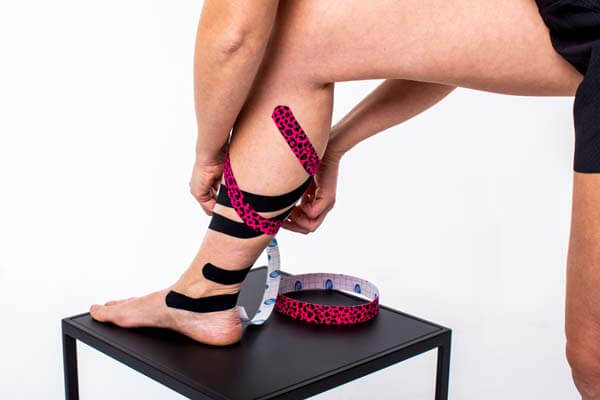
Step 6
- Gently rub the tapes to activate the adhesive and secure them firmly to the skin.
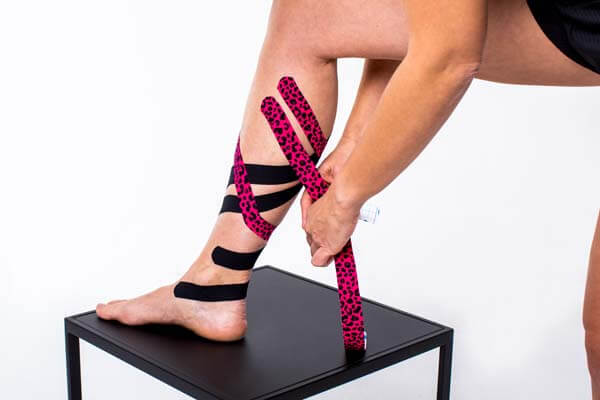
step 7
- Check that all three strips lie flat against the skin without wrinkles or tension at the anchors.
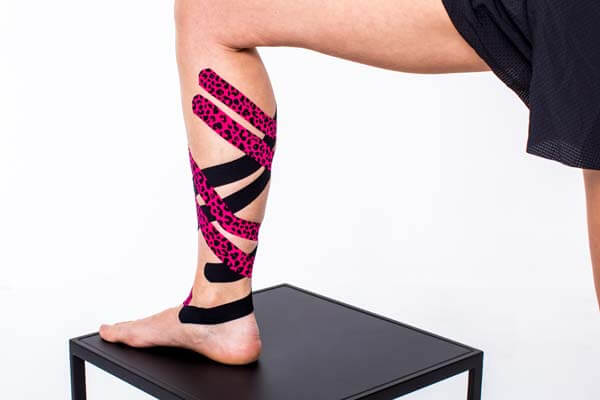
Step 8: Final result
- The three strips should form a spiral fan pattern covering the lower leg from below the knee to the ankle.
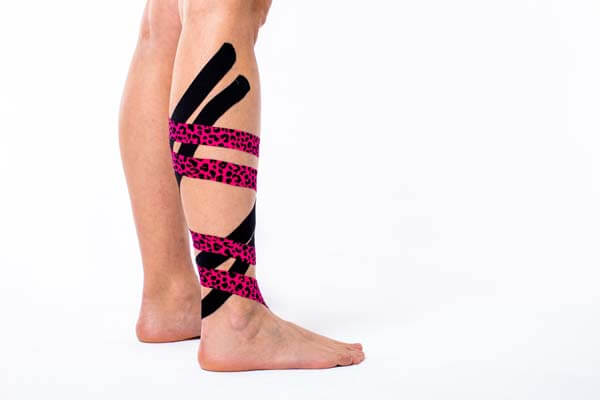
Complete
- The taping is complete. The tape can be worn for 3–7 days and is suitable for showering.
Popular products to tape your calf
-

CureTape® Classic
€9,95In stockSelect options This product has multiple variants. The options may be chosen on the product page -
CureTape® Art
€10,95In stockSelect options This product has multiple variants. The options may be chosen on the product page -
CureTape® Sports Extra Sticky
€10,95In stockSelect options This product has multiple variants. The options may be chosen on the product page -
CureTape® Soft Touch Scissor
€12,95In stockAdd to cart



 Trusted by professionals for 25+ years
 Europe-wide shipping
Free delivery from €100
Europe-wide shipping
Free delivery from €100 When taping your calf, it’s crucial to choose a tape that provides strong adhesion and support. That’s why I recommend CureTape kinesiology tape. For regular use, CureTape Classic or Art is ideal. However, if you’re engaging in extreme sports or swimming, opt for the extra sticky CureTape Sports variant! I have selected practical, easy-to-follow self-taping applications alongside a few valuable tips from clinical experience. For an optimal recovery, remember to combine this taping with specific calf stretching and strengthening exercises, and always consult a physiotherapist or GP if your symptoms persist.
For the self-taping instructions, I have selected applications that can be applied easily on your own. To make sure the treatment is carried out safely, I provide practical advice to consider before, during and after taping. These recommendations are based on my many years of experience in practice. If the complaints persist, always consult a physiotherapist or your GP.

Disclaimer: Please note: the suggested tape applications and the information on our website regarding the possibilities of the Medical Taping Concept are not yet scientifically proven. The stated claims are based primarily on extensive experience from therapists and users of CureTape® products. No rights can be derived from the content on this website.
Contraindications for not using tape: pregnancy, open wounds, bone fractures, unexplained complaints, allergies and skin conditions, medication use such as blood thinners, thrombosis, and fever. Always consult a medical professional if in doubt.